
Best Bright Neon Nail Colors To Make Your Summer
Bright neon nail colors are the perfect way to brighten up your look and add a splash of energy to your summer style. These bold shades—ranging from electric pinks to lime greens and highlighter oranges—bring a fun, youthful glow to your hands. Nail art is more than just a beauty trend; it’s a simple yet expressive way to show personality and mood. Whether you prefer short nails or long almond shapes, neon shades instantly catch the eye and uplift even the simplest outfits. Pairing these vivid colors with soft summer tones or beachy accessories creates a stylish, sun-kissed vibe that’s both playful and elegant. These colors not only enhance the natural shape of your hands but also radiate confidence with every gesture.
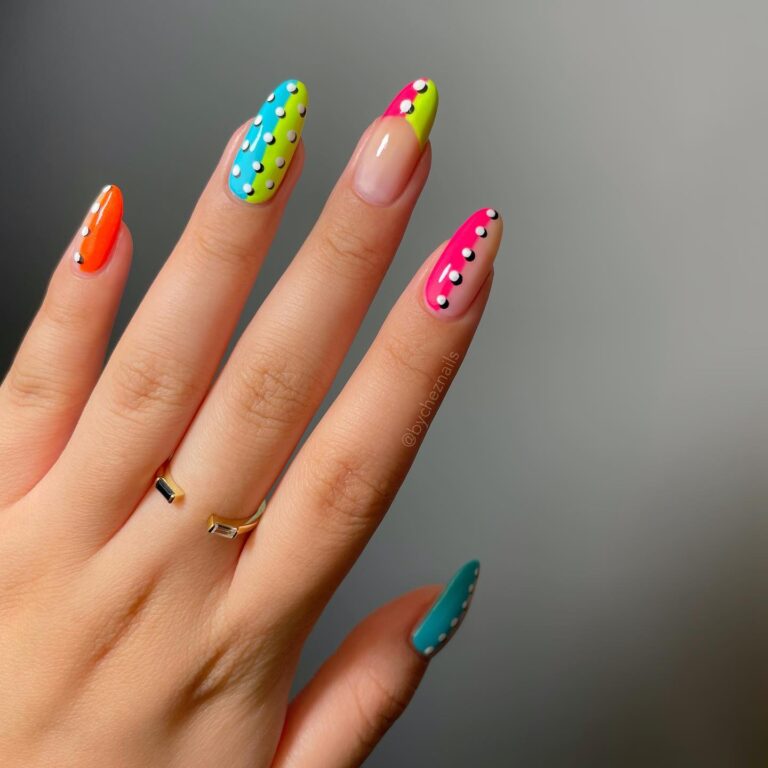
To make your neon nails stand out even more, try adding subtle yet striking designs. Floral accents, glitter-dusted tips, and clean minimalist lines are just a few beginner-friendly options that elevate a basic manicure into something truly stunning. For example, neon yellow nails with glossy finishes bring sunshine to your fingertips, while pink and green combinations with floral details add a charming, tropical touch. Some designs seen in current trends feature pastel-neon gradients or wavy lines outlined in white for a soft yet modern look. Tiny gems or shimmer on accent nails can also give your manicure a polished, festive twist. These styles are easy to recreate and perfect for those looking to try something new without overwhelming the design. Whether you’re heading to the beach or enjoying a summer brunch, bright neon nail colors with thoughtful touches bring the perfect blend of charm, boldness, and seasonal flair.

Glow Neon Nail Design Tips
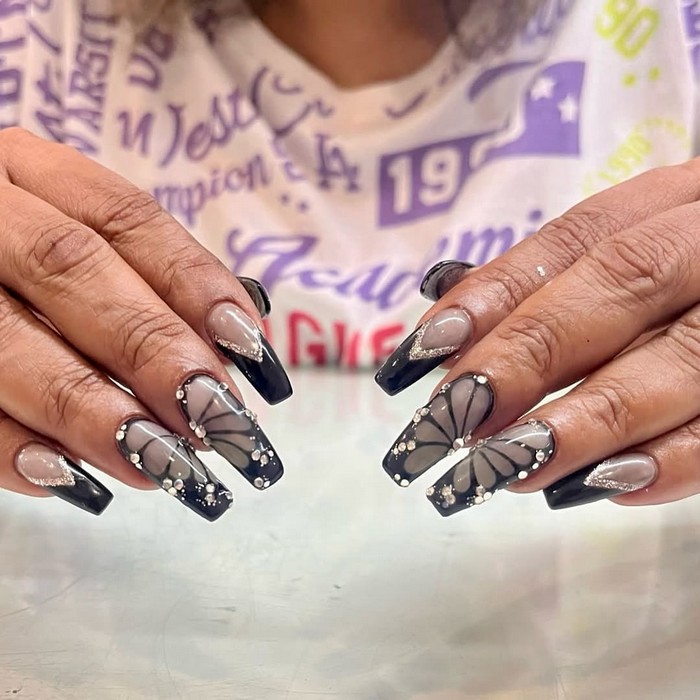
Glow Neon Nail Design Tips bring a vibrant edge to your manicure, perfect for parties, summer fun, or even a bold everyday look. This style uses intense neon colors that glow subtly under backlight or bright lights, creating a soft neon outline—like a glowing sign—for a dramatic effect. To achieve it, begin with a clean, matte or glossy black base, then apply thin neon polish lines in shapes like swirls, flowers, hearts, or abstract patterns. Essential materials include a black base coat, neon gel or polish (pink, green, blue, etc.), a fine nail art brush or striping tool, and a clear top coat. With everything poured out and tools ready, expect to spend about 30 to 45 minutes on one set—10 minutes for base layers, 15–20 minutes drawing neon details, and another 10 minutes for sealing and curing.
You can customize your design in many ways: go full neon glow by outlining each nail, or choose accent fingers with neon detailing against a neutral background. Mix shades to create a rainbow glow effect, or add chrome powder or glitter for extra shine. For a softer look, try a white or milky base with glowing neon tips or shapes. Gel polish ensures the design lasts 2–3 weeks, while regular polish gives about a week of wear. Whether you opt for minimalist neon lines or bold glowing art with multiple colors, this Glow Neon Nail Design is easy, trendy, and ideal for anyone looking to light up their look.

Trendy Neon Nail Art
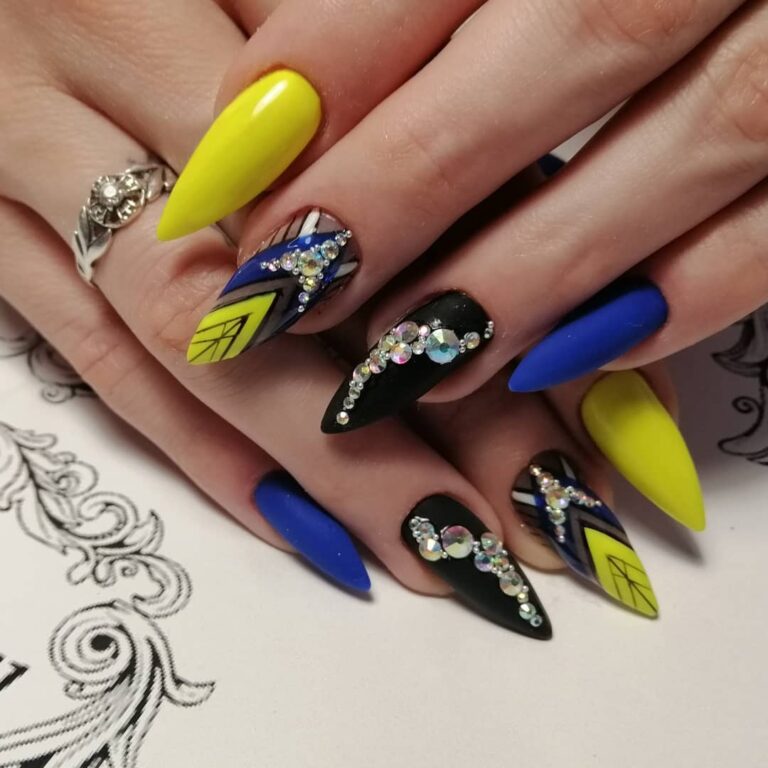
Trendy Neon Nail Art is a bold, eye-catching style that adds a pop of color to any look. Perfect for parties, summer outings, or social media photos, this nail design instantly grabs attention with its vibrant neon shades and glowing patterns. The style usually features bright lines or swirls that contrast beautifully with a neutral or black base, creating a glowing effect under UV light. This fun and modern nail art works well on both short and long nails, offering a fresh twist to traditional manicures.
Creating this look involves a few simple steps. Begin with a base coat to protect the nails, followed by a dark polish to help the neon colors stand out. Using a fine nail brush or striping tool, apply neon gel polish in smooth, curved patterns. A UV or LED lamp is used to cure each layer, ensuring long-lasting wear. Materials needed include neon gel polishes, a base and top coat, a UV/LED lamp, and thin nail brushes. The design takes about 45 to 60 minutes to complete, depending on the detail. Variations can include different neon shades, gradient effects, or even adding tiny rhinestones for extra sparkle. This glowing nail art is a stylish way to express creativity while staying on trend.

Best Bright Neon Nail Ideas
A bright neon manicure can instantly elevate any look—perfect for a music festival, a bold night out, or a fun everyday vibe. These dazzling nails stand out with glowing swirls, colorful French tips, or tiny shapes like stars or fruits, turning hands into mini art pieces. To create this at home or in a salon, begin with clean nails and apply a base coat to protect against staining (en.wikipedia.org). Next, choose several neon gel polishes (think electric pink, lime green, sunshine yellow). Use thin nail brushes, striping tape, or a makeup sponge for smooth gradients, sharp lines, or ombré effects. Finish with a glossy top coat to seal in the shine. Altogether, this manicure takes about 45 to 60 minutes—quick enough for a weekend pick-me-up yet thorough enough for long-lasting results.
The materials list is simple: base coat, neon gel or polish shades, nail brushes or dotting tools, striping tape or thin brush, sponge (for ombré), and a top coat. Time-wise, plan for an hour including drying or curing under a lamp. Variations are limitless: go nude with just neon outlines, mix in chrome powders for a mirror finish add mismatched designs like zebra stripes, shapes, or tiny studs, or even create aura-style bursts by concentrating color at the center of the nail . Whether it’s a full neon canvas, playful tips, or delicate dots, these bright neon nail ideas offer a cheerful way to let your personality shine right at your fingertips.

Hot Neon Nail Looks
Bright and bold, Hot Neon Nail Looks shine with vibrant energy that instantly elevates any outfit or mood. Perfect for summer beach trips, music festivals, or just adding a pop of color to daily wear, this style turns hands into eye-catching fashion statements. Achieving this glowing manicured look requires a few simple steps and the right materials: start with clean, shaped nails, then apply a peel-resistant base coat to protect the natural nail. Choose two to three neon polishes—think electric yellow, hot pink, or bright blue—and apply two thin coats, allowing each layer to dry before adding the next. Finish with a glossy top coat to seal in shine and longevity. This process usually takes around 40 to 50 minutes from prep to final seal, giving nails a radiant, long-lasting look.
Neon designs offer endless room for creativity and personal flair. Simple to create yet striking in effect, consider adding variations like neon French tips, mismatched Skittle nails, or swirling geometric patterns using a fine brush or dotting tool. For even more flair, layer neon chrome or holographic powders to deepen the glow and texture. Beginners can paint neon dots or stripes, while more skilled mani artists might try ombré blends or aura effects. With these options, the neon nail trend suits both laid-back and bold expressions, making style easy and fun.

Vibrant Neon Nail Styles
Vibrant Neon Nail Styles are a bold and eye-catching way to elevate any look, perfect for parties, summer outings, or adding color to everyday wear. These glowing nail designs typically feature bright neon shades like electric pink, lime green, vivid orange, or highlighter yellow, often layered with glossy top coats or glowing patterns for extra impact. Whether used for a night out or a fun daytime statement, neon nails are all about energy and expression. Their standout colors draw attention effortlessly and can be styled with ombré blends, sharp graphic lines, or even subtle glow-in-the-dark effects.
Creating vibrant neon nails usually takes about 45 minutes to an hour, depending on the complexity of the design. The basic materials needed include a neon gel polish set, a UV or LED lamp for curing, a fine detail brush, base coat, and top coat. For more intricate designs, nail stickers, dotting tools, or foil can be added for texture and variation. From glowing French tips to swirling neon gradients or abstract shapes, these nails offer endless possibilities. They can be customized to match outfits, moods, or seasons, making them a versatile and exciting choice for anyone wanting to make a bold, fashionable statement.

These Neon Nail Design Tips
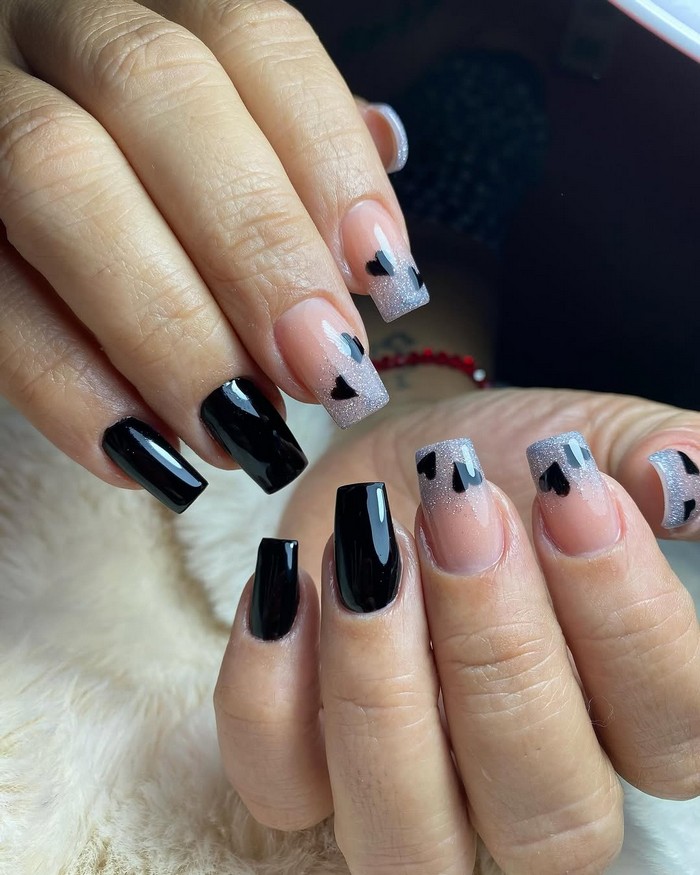
Neon nail art can instantly lift any look—whether worn for summer events, nights out, or just everyday brightness. To recreate this style, start with a clean base coat and a white or clear foundation. Next, apply vivid neon polishes—such as electric blue and bright green—in soft swirling or marbled patterns across each nail. The materials needed are basic but effective: neon gel polishes or high-pigment lacquer, a fine nail‑art brush or small sponge for blending, and a glossy top coat. The entire process usually takes about 30–45 minutes, depending on drying time, and the result is a glowing, eye‑catching shine that stands out even in dim light.
To customize the look, mix and match bright colors—think neon pink, orange, or yellow—for playful stripes, checkerboards, or half-and‑half designs. Try alternating neon tips, adding glitter accents, or creating negative‑space crescents at the cuticle for a modern twist. This flexibility makes it easy to adapt the design for short or long nails, making each set uniquely expressive. With just a few tools and under an hour, these neon nail designs bring both fun and flair to any wardrobe—plus there’s room to explore endless variations based on personal taste .

Perfect Vibrant Neon Nail Styles
Bright, lively neon nails are perfect for making a bold statement at parties, beach days, festivals, or just to add a burst of color to everyday life. These nails work beautifully with simple outfits by drawing attention to your hands, and they also shine under black light—making them great for evening events. To create this look, the nails start with a clean, shaped base. A coat of white or pale polish helps the neon colors pop. Then, neon shades are painted in full coverage or combined in eye-catching patterns like ombré fades, stripes, or playful spots.
To make this style, gather a few neon polishes (pink, green, orange, yellow or your favorites), a white base polish, a top coat, a small brush or sponge for blending, and nail prep tools (file, buffer, cuticle pusher). The process takes around 45 minutes to an hour, including drying time and applying a glossy top coat. Variations might include mixing two neon colors for a sunset fade, adding small geometric shapes with a thin brush, or even dotting tiny white accents for contrast. Changing the base shade—like using a pastel instead of white—or adding a hint of glitter can give each set a unique twist while still keeping the bold, glowing appeal.

Perfect Neon Nail For Every Season
The perfect neon nail design for every season is a bold yet versatile look that adds a burst of energy to any outfit. Featuring a smooth blend of vibrant colors—like hot pink, electric yellow, and neon orange—this nail art instantly brightens up the hands and suits everything from summer vacations to winter parties. Whether it’s a casual day out or a festive event, the high-gloss finish and sleek gradient effect make this design stand out. Its style is both playful and polished, with a touch of modern glam that can be easily adapted to personal preferences, such as adjusting the color combination or adding minimal accents like thin stripes or rhinestones.
Creating this neon nail look takes around 30 to 45 minutes and is simple enough for those familiar with basic nail techniques. To achieve it, start with a clean base coat followed by blending neon gel polishes using a sponge or brush for a seamless ombré effect. A UV or LED lamp is essential to cure each layer, and a high-shine top coat seals the design for long-lasting wear. Some variations include adding matte finishes or switching neon shades to match seasonal trends—lime green for spring, fiery coral for summer, neon blue for fall, and frosted neon tones for winter. The result is a fresh, eye-catching manicure perfect for any time of year.

Neon Nails That Shine Brighter
Discover the magic of neon nails that shine brighter—a lively and modern twist on traditional nail polish that grabs attention wherever you go. Perfect for special occasions, summer festivals, or just adding a pop of color to your daily look, this style uses vibrant fluorescent shades—like electric pinks, greens, or oranges—that glow under natural or black light. To achieve this bright, eye-catching effect, begin with clean, prepped nails and apply a smooth base coat. Then, layer on a neon polish, allowing each coat to dry fully before adding the next. Finally, seal the look with a glossy top coat to enhance the shine and protect the color. The process takes about 45 to 60 minutes, including drying time, making it a fun and manageable at-home or salon option.
This neon look is easy to personalize with endless variations. For a playful twist, add thin white stripes or tiny dots using a fine brush for contrast. Another idea is to create a subtle ombré by blending two neon shades from the cuticle toward the tip. Needed materials are simple: neon polish(s), base coat, top coat, a thin detail brush or dotting tool, and nail prep tools like a file and buffer. All these items are easy to find online or in beauty stores. Whether sticking to a single bold shade or mixing colors and patterns, the glowing finish always draws compliments. In under an hour, this stylish neon nail art offers a fun way to express personality with a bright, modern flair.

Neon Nails Brighter Than Summer Sunlight
Immerse your fingertips in vibrancy with “Neon Nails Brighter Than Summer Sunlight,” a radiant nail‑art style perfect for beach days, festivals, or simply making everyday moments feel electric. To create this look, begin by applying a base coat, followed by two coats of neon polish—think electric pink, lime yellow, or vivid turquoise. Use a small sponge or fine brush to blend in a secondary neon shade on each nail, creating soft gradients or bold swirls. This process takes about 45 minutes, including drying time. Required materials include base and top coats, at least two neon gel or regular polishes, a sponge or nail‑art brush, and optionally chrome or glitter powders for extra shine .
Variations are where the fun really shines. Try micro‑French tips in contrasting neon hues, tie‑dye swirls, flame outlines, or minimalist dot accents using a dotting tool . Add chrome powder on lime bases or incorporate tiny rhinestones or jelly layers for a translucent effect . This style works beautifully at home, with each nail becoming its own neon masterpiece. Whether you opt for full coverage, ombré blends, or accent designs, these nails will glow as brightly as the sun—making them a stunning statement all summer long.