
Glowing Bright Neon Nail Designs to Elevate Your Style
To ensure neon nail designs maintain their vibrancy and longevity, adopting certain habits and using the right products is essential. First, consider applying a high-quality base coat before the neon polish. This not only protects the nail from staining but also enhances the color’s brightness and longevity. Opt for a neon-specific top coat to seal the color and add an extra layer of protection against chipping and fading.
Everyday habits play a crucial role in nail care. Avoid exposing nails to harsh chemicals and excessive water, which can dull and weaken the polish. When performing chores like washing dishes, consider wearing gloves to prevent unnecessary contact with water and detergents. Regularly applying a cuticle oil or moisturizer will keep the surrounding skin healthy, which supports overall nail integrity.
If the design shows signs of wear, refreshing it can be simple. Lightly buff the nail surface to even out any imperfections, and fill in chips with the original polish. Reapply the top coat every few days to maintain shine and protection.
When it’s time to remove neon nail polish, it’s important to avoid damaging the nail. Use an acetone-free polish remover to prevent excessive drying of the nails. Soak a cotton pad in the remover, place it on the nail, and allow it to sit for a few minutes. This softens the polish, making it easier to gently wipe away without scrubbing. Finally, rinse hands thoroughly and apply a nourishing hand and nail cream to restore moisture and maintain nail health.

Colorful Neon Nail Styles
Maintaining neon nail designs can be challenging due to their susceptibility to chipping and fading. To achieve chip-free, vibrant nails that last longer between salon visits, consider adopting a few strategic steps. Using a high-quality base coat is essential as it provides a smooth foundation and enhances the neon color’s adherence.
Regularly applying a robust top coat acts as an additional barrier, protecting against chipping and dullness. Everyday activities involving water and chemicals can weaken the polish, so wearing gloves during chores can significantly extend the life of neon nails. Also, UV exposure can cause neon colors to fade; therefore, avoid prolonged sun exposure and consider using a UV-protective top coat. If chips do appear, quickly touch them up with the same neon polish and reapply the top coat to maintain the design’s overall integrity.

Neon Nail Art Inspirations
Advanced neon nail art techniques offer endless possibilities for experienced nail enthusiasts, transforming nails into stunning canvases. Creating Ombre effects involves blending vibrant neon shades seamlessly, often using a sponge to dab colors gently onto the nails for a gradient look. Neon marbling adds a psychedelic twist, achieved by dropping neon polish into a water bowl and swirling with a stick before dipping the nail. This method offers unique patterns each time.
Geometric patterns require precision and can be accomplished using striping tape or thin nail art brushes to outline and fill in shapes with neon hues. Essential tools like dotting tools and fine detail brushes enhance the design’s intricacy. For long-lasting vibrancy and smooth application, using a quality base coat and a gel top coat is recommended. These techniques not only require skill but also unleash creativity, making neon nail art an exciting venture for seasoned artists.

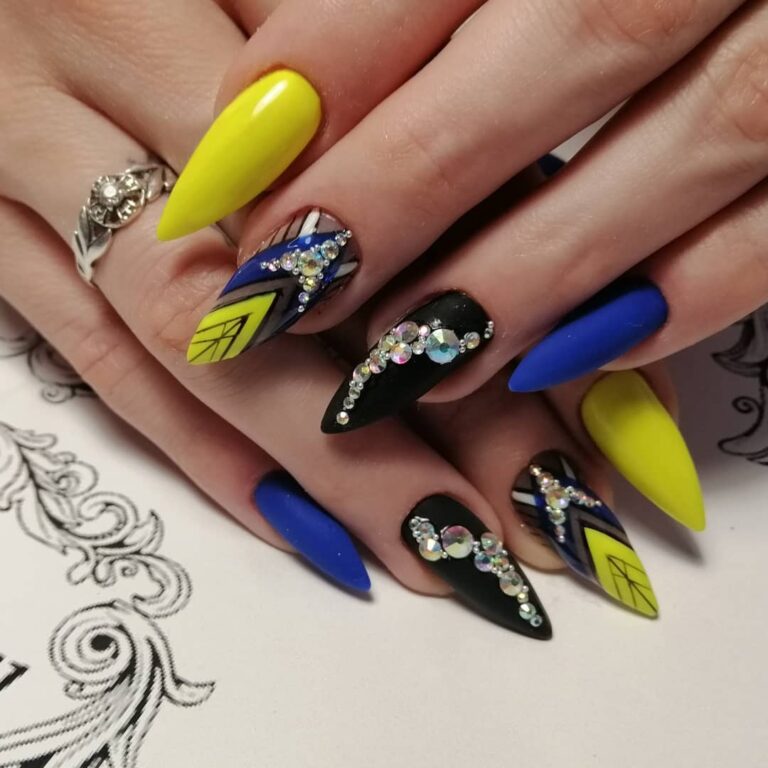
Bright Neon Nail Trends
Achieving and maintaining professional neon nail designs requires specific techniques and tools. Gel polishes are ideal for extended wear due to their durability and intense pigmentation. Begin with proper nail preparation by ensuring nails are clean, trimmed, and shaped to prevent lifting. Apply a high-quality base coat to protect natural nails and enhance adhesion of the neon polish. Use thin layers of gel polish, curing each layer under a UV or LED lamp to ensure a long-lasting finish.
For precise application and intricate designs, fine detail brushes, dotting tools, and striping tapes are essential. After applying the neon polish, finish with a gel top coat to seal the color and add shine. Regular maintenance, such as moisturizing cuticles and avoiding harsh chemicals, can prolong the vibrancy and integrity of the design. Following these steps guarantees stunning, salon-quality neon nails.

Electric Neon Nail Ideas
Using vibrant colors like neon pink, green, and yellow for the tips of the nails gives a modern twist to the classic French manicure. This design is highly popular for its playful yet sophisticated look. Recreate this by applying a clear base coat and using a thin brush to carefully paint each tip with a different neon color.
Neon Geometric Patterns:
Combining bright neon shades such as neon blue, orange, and purple with clean geometric shapes creates a bold statement. These designs are trendy for their edgy and artistic appearance. Use striping tape to achieve sharp lines and apply the neon colors within the taped edges.
Neon Ombre Effect:
Blending neon pink and orange creates a mesmerizing ombre effect. This gradient look is widely loved for its seamless transition between colors. A sponge can help achieve this by dabbing the colors onto the nails after applying a white base coat.
Neon Animal Print:
Incorporate neon green and yellow with black to create striking leopard or zebra prints. This design is popular for its wild and daring style. Use a detail brush to paint the animal patterns over a neon base.
Neon Marble Effect:
Mix neon blue and purple for a faux water-marble effect. This look is popular due to its unique and fluid appearance. Use a water-marbling tool or a toothpick to swirl the colors on the nail after applying a white or clear base.

Vibrant Neon Nail Designs
Neon nails are incredibly versatile and can make a striking impact in various settings. For casual outings, a simple neon gradient or neon accents can add a playful touch to everyday outfits like jeans and t-shirts. For parties, bold neon patterns such as animal prints or geometric shapes can complement fun and edgy accessories, making a statement. At formal events, subtle neon highlights or neon French tips offer a chic and modern twist to classic looks, perfectly matching sleek cocktail dresses or elegant gowns.
To recreate neon French tips at home or in a salon, start by applying a sheer nude or clear base coat. Using a thin brush, carefully paint the tips of each nail with a vibrant neon color, such as neon pink or neon green, as inspired by the design on the Instagram link. Finish with a high-gloss top coat to enhance the shine and longevity of the manicure.

Bold Neon Nail Art
Creating a striking neon ombre nail effect requires precision and the right materials. Begin with a base coat to protect and smooth the nails. Next, apply a base layer of white polish to enhance the vibrancy of the neon colors. Allow it to dry completely.
For the gradient, choose two or three complementary neon shades. Using a damp makeup sponge, apply the neon polishes in horizontal stripes, slightly overlapping each color. Dab the sponge onto the nail, starting from the tip and moving towards the cuticle to achieve a seamless blend.
Repeat this process for a more intense effect, allowing each layer to dry before reapplying. Clean any excess polish around the nails with a brush dipped in nail polish remover. Finish with a high-gloss top coat to seal and protect the design, ensuring a long-lasting, vivid neon Ombre.