
Pastel Hues For Soft, Summer-Ready Nail Art
Pastel hues are perfect for achieving soft, summer-ready nail art that adds a touch of elegance and freshness to your style. These gentle colors, like baby blue, soft pink, and mint green, are ideal for a relaxed and airy vibe. Pastel nails complement any summer outfit and are great for vacations, beach trips, or just everyday wear. They offer a chic, understated look that still stands out in a crowd while staying sophisticated and on-trend.
Making:
To create soft, summer-ready nail art with pastel hues, start by selecting a range of pastel nail polish colors. Begin with clean, trimmed nails. Apply a base coat to protect your nails and help the pastel colors pop. Once the base coat dries, apply the first chosen pastel color in even strokes. Allow it to dry completely before applying a second coat for opacity. You can get creative by using different pastel hues for each nail or adding simple designs using nail art tools. Finish with a glossy top coat to seal in the color and add shine. Be sure to tidy up any edges using a small brush dipped in nail polish remover for a clean look.
Materials:
- Base coat
- Pastel nail polish (e.g., baby blue, soft pink, mint green)
- Top coat
- Nail art tools (optional)
- Nail polish remover
- Small brush for touch-ups
Pastel hues for nail art add a soft and stylish touch to your summer look, making your nails beautifully summer-ready.

Tropical Vibes With Palm Nails
Meta Description:
Create a tropical paradise on your nails with palm nail art. Perfect for summer and easy to achieve at home. Tropical vibes with palm nails are ideal for anyone looking to make a bold, summery statement. Perfect for vacations, beach outings, or poolside parties, these nails encapsulate the essence of a tropical getaway. Their vibrant tones and palm tree designs evoke a sense of relaxation and adventure, making them perfect for festive summer gatherings. Not only do they add a splash of color, but they also complement a wide range of summer outfits, adding a fun and stylish touch to your look.
Making:
To achieve tropical palm nails, start by gathering your materials. Begin with a clear base coat to protect your nails and help the colors adhere better. Once dry, apply a bright base color such as turquoise, coral, or yellow to each nail. Allow the first coat to dry, and apply a second coat for a more vibrant effect. Use a thin nail art brush dipped in black or dark green polish to create palm tree designs – draw a thin line for the trunk and small curved lines for the leaves. Seal the design with a top coat to add gloss and longevity. Clean up any edges with a small brush dipped in nail polish remover for a perfect finish.
Materials:
- Base coat
- Bright nail polish (turquoise, coral, yellow)
- Black or dark green nail polish
- Thin nail art brush
- Top coat
- Nail polish remover
- Small brush for touch-ups
Elevate your summer style with tropical palm nails, bringing a piece of paradise to your everyday look.

Sunset Gradient Nails For Summer
Meta Description:
Brighten up your summer look with stunning sunset gradient nails. Perfect for a vibrant and trendy style.
Uses:
Sunset gradient nails are perfect for those who want a bright and beautiful summer look. This nail design uses warm, sunset-like colors to add a vibrant and trendy touch to any outfit. Ideal for beach parties, summer vacations, or everyday wear, sunset gradient nails capture the breathtaking colors of the evening sky. They showcase a smooth blend of hues like pink, orange, and yellow, evoking the beauty of a summer sunset. This style is not only eye-catching but also adds a cheerful and dynamic vibe to your look.
Making:
Begin by preparing your nails with a clear base coat to ensure a smooth surface and protect your nails. Choose three gradient nail polish colors representing a sunset, such as pink, orange, and yellow. Apply a strip of each color on a makeup sponge, slightly overlapping each strip. Dab the sponge onto your nails to transfer the gradient effect. Repeat this process to intensify the colors. Allow the gradient to dry and apply a clear top coat to seal in the design and add shine. Clean up the edges using a small brush dipped in nail polish remover for a neat finish.
Materials:
- Base coat
- Nail polish (pink, orange, yellow)
- Makeup sponge
- Top coat
- Nail polish remover
- Small brush for touch-ups
Sunset gradient nails bring the vibrant beauty of a sunset to your fingertips, making your summer style shine.

Sparkling Glitter For Warm Weather
Sparkling glitter nails are ideal for adding shimmer and shine to your look during warm weather. These nails are perfect for beach outings, summer parties, music festivals, or any daytime or nighttime events that call for a bit of sparkle. The glitter catches the light and provides a fun, festive, and eye-catching appearance, making your nails stand out. They are not only trendy but also versatile, easily pairing with a variety of summer outfits.
Making:
To create sparkling glitter nails, start by applying a clear base coat to protect your nails and ensure a smooth application. Choose a base color that complements the glitter, such as nude, pink, or any bright summer hue. Once the base color is dry, apply a glitter nail polish over the top. You can either use a polish with fine glitter for a subtle look or choose chunky glitter for a more dramatic effect. Apply multiple coats if you want an intense sparkle. Finish with a clear top coat to seal the glitter and add extra shine. Clean up any excess polish around the nails using a small brush dipped in nail polish remover.
Materials:
- Base coat
- Base color nail polish (nude, pink, or bright)
- Glitter nail polish (fine or chunky)
- Top coat
- Nail polish remover
- Small brush for clean-up
Sparkling glitter nails bring a touch of glamor to your summer style, keeping your look vibrant and festive.

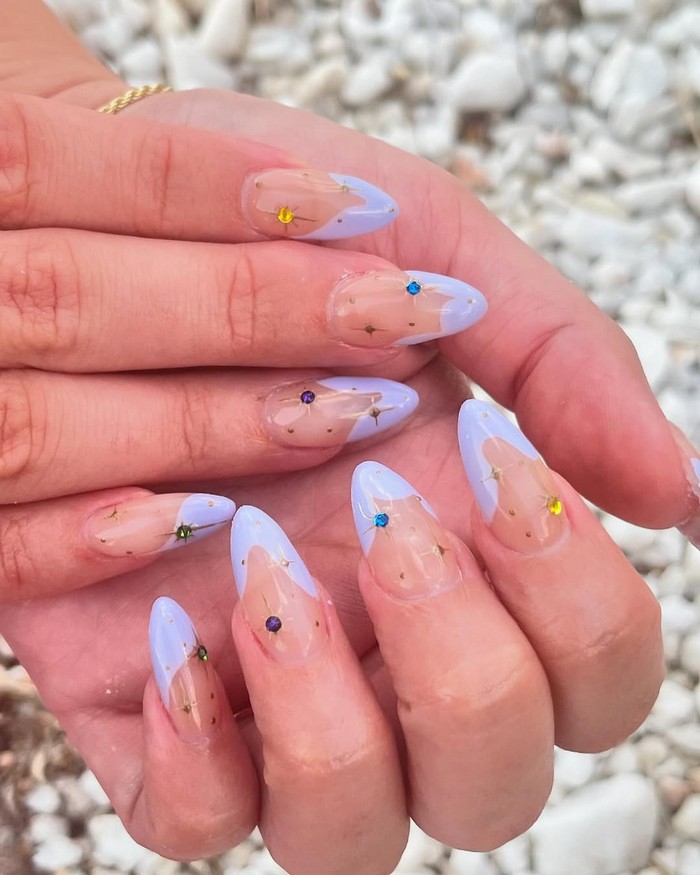
Pastel Shades For Soft Nails
Pastel shades are ideal for those seeking a soft and elegant touch to their nails. These light and pleasant colors are perfect for any occasion, from casual outings to more formal events. Pastel nails are great for spring and summer, as they add a fresh and airy feel to your overall look. The gentle hues like baby blue, mint green, soft pink, and lavender give an understated yet polished appearance, making your hands stand out in a sophisticated and stylish way. They easily complement a wide range of outfits and makeup looks, making them a versatile choice for any wardrobe.
Making:
To achieve beautiful pastel nails, start by applying a protective clear base coat on your nails to create a smooth foundation. Choose your favorite pastel nail polish shades. Apply the first coat of pastel polish to each nail and let it dry completely. For a more opaque finish, apply a second coat of the pastel polish. Once the polish is dry, seal in the color and add shine with a clear top coat. This step also helps to make your manicure last longer. Finally, clean up any polish that might have gotten on your skin using a small brush dipped in nail polish remover.
Materials:
- Base coat
- Pastel nail polish (baby blue, mint green, soft pink, lavender)
- Top coat
- Nail polish remover
- Small brush for clean-up
Pastel nails deliver a delicate elegance that perfectly suits the softness of summer days, enhancing your natural beauty with a charming, sophisticated touch.

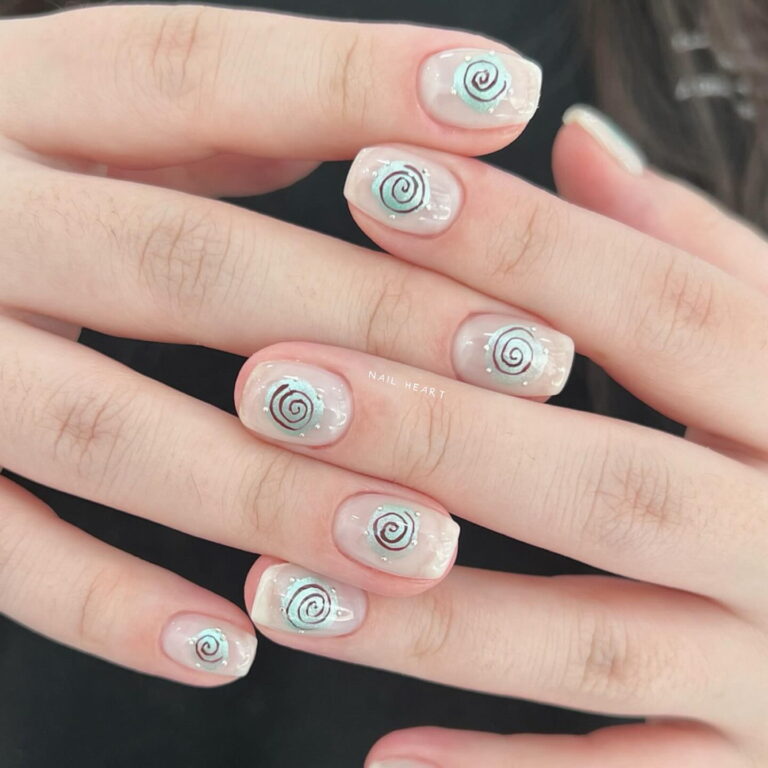
Ocean Waves Inspired Nail Designs
Meta Description:
Get trendy with ocean waves inspired nail designs, perfect for a beachy, summer look.
Uses:
Ocean waves inspired nail designs are ideal for anyone wanting to bring the beach to their fingertips. These designs are perfect for summer holidays, beach parties, or simply adding a touch of the ocean to everyday life. The cool blue tones and wave patterns create a calming and refreshing aesthetic. This trendy look pairs well with summer outfits and is sure to draw attention. Not only do they evoke feelings of relaxation and nature, but they also add an artistic flair to your nails.
Making:
To create ocean waves inspired nail designs, start by applying a protective base coat to your nails. Choose blue nail polish in different shades to mimic the ocean’s depth. Apply a light blue polish as the base color and let it dry. Using a small brush, create wavy patterns with darker blue polish to resemble ocean waves. Blend the edges slightly to make the waves look natural. Add accents with white polish to imitate the foam of the waves. Once the design is complete, finish with a clear top coat to seal and add shine. Clean around the nails with a small brush dipped in nail polish remover for a polished finish.
Materials:
- Base coat
- Light blue nail polish
- Dark blue nail polish
- White nail polish
- Top coat
- Small brush for detailing
- Nail polish remover for clean-up
Ocean waves nail designs bring the beauty of the sea to your nails, making them a perfect summer trend.

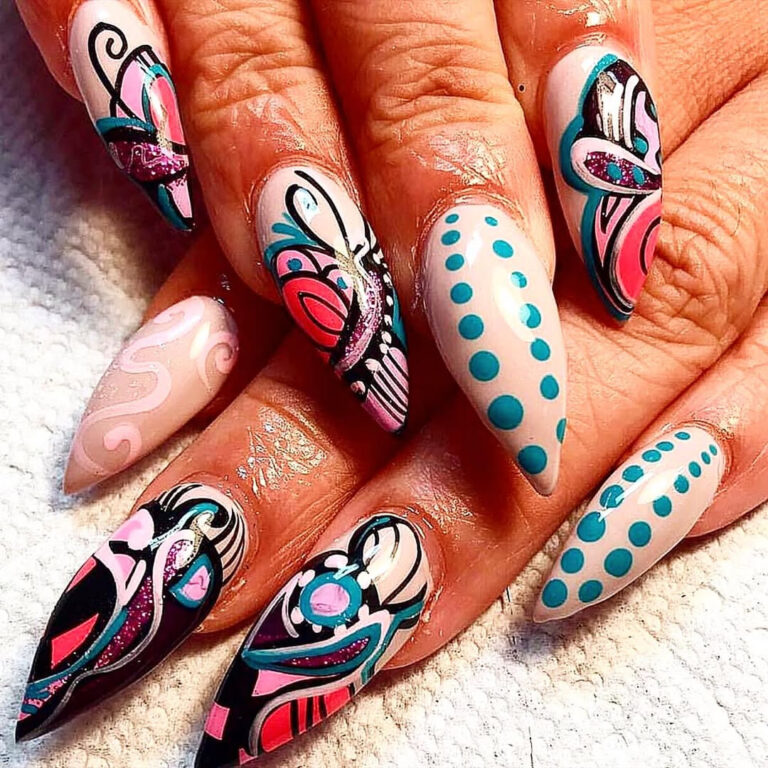
Glittery Gold Accents On Nails
Glittery gold accents on nails are perfect for adding a touch of glamour and sophistication to any look. These shiny and bright details are ideal for special events like parties, weddings, or even a night out. Glittery gold nails catch the light beautifully, making your hands stand out and adding a luxurious feel to your appearance. The reflective nature of glittery gold creates a chic and fashionable impression. It’s a versatile nail design that pairs well with a range of fashion choices and brings a sparkle to everyday wear.
Making:
To create glittery gold accents on your nails, start by applying a clear base coat to protect them. Choose your favorite base color polish and paint your nails completely. Let it dry thoroughly. Using a glittery gold nail polish, add accents to your nails. This can be done by creating gold tips, adding gold lines, or highlighting specific areas of the nail. For a more detailed design, use a thin nail art brush. Once you are satisfied with the glitter placement, apply a clear top coat to seal and protect the design, giving it a glossy finish. Clean any excess polish around the nails using a small brush dipped in nail polish remover.
Materials:
- Base coat
- Base color nail polish
- Glittery gold nail polish
- Nail art brush
- Top coat
- Nail polish remover for clean-up
Glittery gold accents bring a burst of elegance and shine to your nails, making them the perfect choice for a glamorous look.

Fun Stripes For Summer Nails
Meta Description:
Brighten your style with fun stripes for summer nails, perfect for a playful and vibrant look.
Uses:
Fun stripes for summer nails are perfect for adding a playful touch to any summer outfit. These vibrant and colorful designs are ideal for beach days, vacation trips, or simply enjoying the warm weather. Striped nails create a cheerful and eye-catching look that pairs well with casual and summer attire. The variety of colors and patterns can reflect personal style, making it a versatile choice. Fun stripes are perfect for standing out at summer parties or enhancing the lighthearted mood of the season.
Making:
To achieve fun stripes for summer nails, begin by applying a clear base coat for protection. Choose bright and bold nail polish colors that represent the essence of summer. Paint each nail with a different color as the background, letting each layer dry completely. Use striping tape or a thin nail art brush to create the stripes on each nail. Experiment with different patterns such as horizontal, vertical, or diagonal stripes. Apply the stripe colors carefully and let them dry fully. Finish with a clear top coat to seal the design and add a glossy shine. For a neat look, clean around the nails with a small brush dipped in nail polish remover.
Materials:
- Base coat
- Bright and bold nail polish colors
- Striping tape or thin nail art brush
- Top coat
- Nail polish remover for clean-up
Fun stripes bring a lively and colorful touch to your nails, making them just right for the summer season.

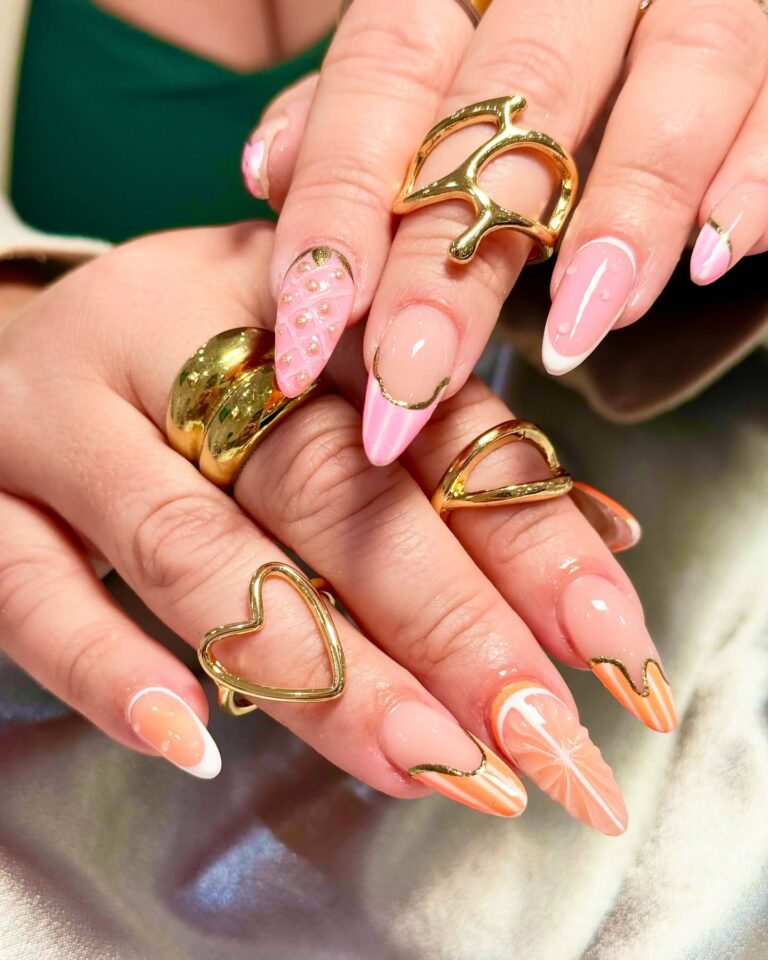
Fruity Nail Art Designs Ideas
Fruity nail art designs are ideal for adding a playful and vibrant touch to your nails. Perfect for summer or any fun occasion, these designs feature bright images of fruits like strawberries, pineapples, and watermelons. Fruity nail art is great for beach trips, pool parties, or just celebrating the warm, sunny days. The burst of color and cheerful patterns make your nails stand out, adding a fresh and youthful vibe to any ensemble. It’s a great way to showcase your playful side and embrace the carefree spirit of the season.
Making:
To create fruity nail art designs, start by applying a clear base coat to protect your nails. Choose bright and fruity colors such as red, green, yellow, and pink for the base. Paint each nail with a solid color and let it dry completely. Using a thin nail art brush or nail stickers, add fruit designs like strawberries, pineapples, or watermelons on each nail. Detailed brushes are helpful for adding tiny seeds or lines for more realistic fruit images. Let your designs dry thoroughly. Seal your fruity art with a clear top coat to add shine and durability. Clean around the nails with a small brush dipped in nail polish remover.
Materials:
- Base coat
- Bright nail polish colors
- Thin nail art brush or nail stickers
- Top coat
- Nail polish remover for clean-up
Fruity nail art designs bring a burst of fun and freshness to your nails, perfect for a lively and sunny look.

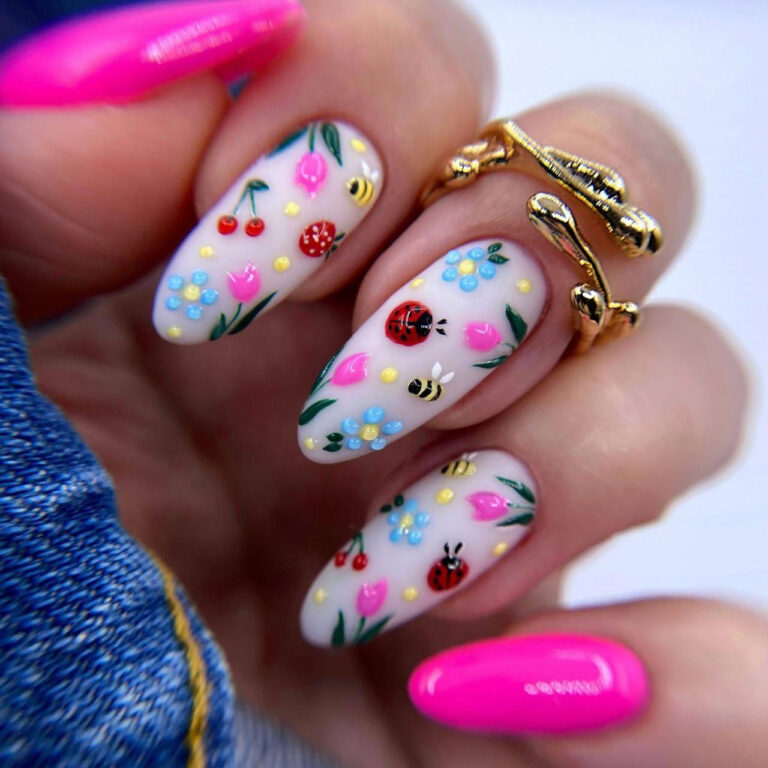
Floral Nail Art For Summer
Floral nail art for summer is wonderful for adding a touch of nature to your style. These designs can go from soft and subtle to bold and colorful, making your nails a perfect accessory for sunny days, garden parties, or vacations. Floral nails enhance your overall look with elegance and charm, capturing the vibrant spirit of the season. Perfect for a picnic, a day at the beach, or a summer wedding, these designs bring the freshness and beauty of flowers to your fingertips.
Making:
To create floral nail art, begin with a clear base coat to protect your nails. Select colors that reflect summer flowers, like pastels or vibrant pinks, blues, and yellows. Paint each nail with a chosen background color and allow it to dry completely. Using a thin nail art brush or dotting tool, draw simple flower shapes like daisies, roses, or sunflowers. Add small details such as leaves or dots to enhance the design. Let the art dry thoroughly before finishing with a clear top coat, adding shine and durability. Clean up any excess with a small brush dipped in nail polish remover.
Materials:
- Base coat
- Pastel or vibrant nail polish colors
- Thin nail art brush or dotting tool
- Top coat
- Nail polish remover for clean-up
Floral nail art designs bring natural beauty and a fresh vibe to your summer look.

Bright Neon Colors For Summer
Bright neon colors for summer are perfect for creating bold and lively nail designs. Ideal for beach parties, music festivals, and summer events, these colors make your nails stand out. Neon shades like hot pink, electric blue, and vivid green add excitement and fun to your look. The high visibility of these colors ensures your nails grab attention, making them perfect for showcasing your adventurous side in the sunny season.
Making:
To achieve bright neon summer nails, start with a clear base coat. Choose neon polish colors such as hot pink, electric blue, and neon green. Apply the chosen neon color to each nail, ensuring a smooth and even layer. Let your neon polish dry thoroughly. For added detail, use a thin nail art brush to create patterns such as stripes or dots in contrasting neon shades. Allow the designs to dry. Finish with a clear top coat to seal the neon art, giving your nails a glossy finish and extra durability. Clean the edges around your nails with a small brush dipped in nail polish remover.
Materials:
- Base coat
- Neon nail polish colors (hot pink, electric blue, neon green)
- Thin nail art brush
- Top coat
- Nail polish remover for clean-up
Using these bright neon colors will ensure your nails are a true reflection of the summer’s vibrant energy.